Our counter top company had called, wanting to move up our template date to Wednesday, July 17, seeing that they would already be in Jacksonville that day (they are based in Tampa), and we were hopeful that this would happen, since we were originally supposed to have them come over on July 15 (back when we had a project completion date of Aug. 1). DH and I were so upset and worried that we'd miss yet another deadline that we got started hanging the cabinets on Monday evening.
(Click on the pictures for enlarged views.)
 |
| Floating shelves are up! |
Monday evening we installed all the rails for the hanging cabinets and by midnight, we'd hung the two floating shelves and 8 cabinets, including the entire pantry, the back fridge wall, and one wall cabinet in the corner next to the stove.
When our carpenter, Alex, did show up Tuesday morning (finally!) he remarked, "I see your husband got a little zealous," referring to the wall cabs which were already hung. (Why does everyone always assume that the wife doesn't do any of the work? Hmph!)
Thoroughly unimpressed with our work, he proceeded to take all of the cabinets down. While completely deflating, it was probably a good move; turns out he was able to better anchor the rails into the studs. Plus, we discovered that the wall where the fridge cover panel was supposed to align wasn't straight in any direction and the rail had to be taken off and trimmed down anyway.
One mistake we made was to cut the Ramsjo island panels (intended for the soffit) for the fridge cover panels. On one hand, Alex was able to trim the panel so it would follow the completely unstraight wall. However, neither of us realized that the cover panel wasn't intended to be flush with the cabinets. Alex was about to cut down the pantry panel (already manufactured to fit the pantry) when I realized that didn't sound right. IKEA's products are designed to be ready for assembly. Cutting down a cover panel is not IKEA's m.o. A quick search of photos online revealed that the cover panels were indeed suppose to protrude about 1/2'' and align with the cabinet doors. Oops.
So now I have an over-the-fridge cabinet whose natural-wood-colored edges show. Oh well. Live and learn. The GC pointed out that we could use the other island panels and redo it, but then we wouldn't have any material for the soffit. Seeing that two island panels cost nearly $300, and we were trying to get both the cabinets and the soffits done it two days, I decided that this was something I could live with. Besides, I can always paint the edges with the color-match paint.
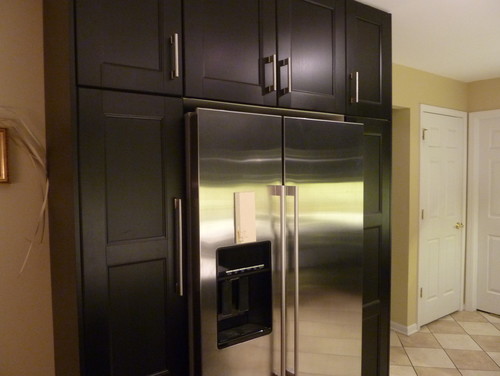 |
| Only the doors on this stainless steel fridge protrude beyond the face of the surrounding Ramsjo Black cabinets -- how do others achieve this look? Is there a recess in the wall? |
One of the most annoying things about IKEA's base cabinets is that they don't provide any way to secure the Faktum feet to the cabinet. There are holes to guide the placement of the feet, but you'd have to go out and buy your own screws to actually affix them. Tons of people have complained about the feet falling off while moving around base cabinets. My husband's solution was to use painter's tape to temporarily keep the feet in place while we moved all the cabinets from the living room to the kitchen. Of course, this meant that every time you wanted to move a cabinet you had to lift it; he feet wouldn't slide at all. My concern was that the feet would somehow collapse later, after everything was in screwed into the walls. DH claimed that these things weren't going anywhere once they were in place. Despite asking probably 100 times that we screw the feet to the base cabs, my husband refused.
 |
| DH's solution to keeping the legs from falling off... |
Much to my delight, the carpenter and GC both agreed that the feet had to be permanently attached. I loved seeing the expression Alex's face when he looked at my husband's band-aid approach; he just smiled and shook his head. So down came "the behemoth" and the feet were attached with 3/4'' screws. Wanting to be helpful, I offered to screw the feet onto the other 10 base cabinets, saving my carpenter some precious minutes to level the wall cabinets on the other side of the kitchen.
 |
| ...vs. Carpenter's better solution to keeping the legs from falling off! |
Alex took some extra time to cut extra cover panels and filler pieces, but by the end of two days, the cabinets were all installed and the appliance were moved back in for the sake of templating the new quartz counters. My kitchen wouldn't look nearly as nice without Alex's knowledge and skill!
While Alex was at work on the cabinets, our GC was arranging for the threshholds, closet floor, and hood vent to be installed. Much of my time was spent painting the laundry room and assembling all the drawers and cabinet doors.
 |
| View of the new pantry and laundry closet beyond. I'm very proud of assembling the doors and drawers all by myself! |
 |
| I surprised DH by fitting out the under-counter microwave cabinet all by myself. We weren't exactly sure how this would work out when we purchased the cabinet, but I made it work with TWO drawers and it looks perfectly planned! A little extra finish trim to hide the cabinet sides and this will be perfect! |
Despite ordering about 15% extra tile, our tilers managed to use every last piece of the stuff, and thus didn't have any extra to create a tile base around the laundry closet. So Friday night DH and I ran to Home Depot to pick out a simple base tile. This also gives us a chance to try our tiling skills before we tackle the backsplash. With any luck, we'll have a functioning laundry facility early next week!
 |
| The new laundry closet is almost ready for the washer and dryer! |
 |
| View from the dining room. |
 |
| View of the fridge wall. |
 |
| View from the back wall. |
 |
| My huge 36'' farmhouse double sink is on site for the countertop template. It took both the carpenter and the tiler to move this thing! |
Hello! I just stumbled across your blog by googling 'caesarstone atlantic salt.' I'm enjoying your kitchen progress because I'm currently in the same situation myself! Actually, it turns out we have strikingly similar taste!
ReplyDeleteI'm installing the Ikea Adel cabinets in white, with Lansa handles, with the Atlantic Salt c-top (measuring happened yesterday)!
I have an answer about your fridge question - that's called a 'counter depth fridge.' They are shallower and don't stick out as much, but they're also pricier. The Ikea counter depth fridge is $1900! I ended up searching Home Depot and Lowe's during July 4th sales and bought a Frigidaire counter depth for a really good sale price (plus got addt'l % off and used Ebates for cash back). I save around $800-900 on the fridge shopping this way.
Well good luck with the rest of your kitchen reno!! ;-)
Hello, Great Job on the Kitchen. We are finishing up a Ramsjo White kitchen also, what paint did you use for the color match trim?
ReplyDeleteHi, would you mind sharing the color you used for the kitchen walls and ceiling?
ReplyDeleteHi, Diggabert! My husband insisted on all Sherwin-Williams paints for the quality, but of course you can always get paints color-matched. The ceiling is actually flat white interior latex (no color added). If I had to do it over again, I would tint the ceiling paint the tiniest bit to be more "pink-ish" like the cabinets and trim. This way you wouldn't see the contrast. Then again, none of my guests notice! For the trim paint, we custom color matched SW's pro-enamel paint with one of our Ikea ramsjo doors. On the walls I have SW's "Alpaca" color. You should double-check the paint number, but I seem to recall the paint color number was 7022. I highly recommend getting sample of the materials you want to use and looking at them together in different light. Splurge on the $7 tinted quart and throw it on the walls before you buy gallons!
ReplyDeleteHI, first off, Congrats on a beautiful renovation! Secondly, could you share with me where did you get the backsplash tiles? what color and brand are they? and are they glass? They match beautifully with the atlantic salt countertops that I'm also getting. Thanks!!
ReplyDeleteHi everybody!
ReplyDeleteMy name is Susana Barker, i am an engineer. I like high-tech, with the best designed refrigerator for my house. Thank for this article, so helpful!
The same site:
http://thecounterdepthrefrigerator.com/frigidaire-fphc2399pf-professional-counter-depth-refrigerator-reviews/
What size is your microwave? I want to do a 24" cabinet and fit a microwave in there as well, but not sure what size microwave could be accommodated? Thanks!
ReplyDelete